Example 2 - Set Up 2 Machines with a Gigabit Link
One of the most exciting parts of using the GENI platform is having access to a gigabit backbone. In this tutorial, we’re going to set up two networked machines just like we did in Example 1, but we’re going to do two things differently:
- Set up a gigabit link between the two machines
- Set up the machines in different parts of the country
- One in Utah
- One in Washington DC
Considerations Before Proceeding
Important: Because GENI is a shared platform, it’s your responsibility as a developer to be mindful of the resources you are requesting. The resources for gigabit networks are limited, so you are encouraged to release those resources as soon as you are finished using them. This will make them available to other developers and experimenters.
It’s also highly recommended that you complete the first GENI example before beginning this one. This tutorial may reference introductory concepts that were explained previously.
Tutorial
The steps of this tutorial are very similar to the last tutorial, up until step number 4.
Step 1. Log In to Your Management Authority
Let’s start by logging into your clearinghouse if you aren’t already authenticated.
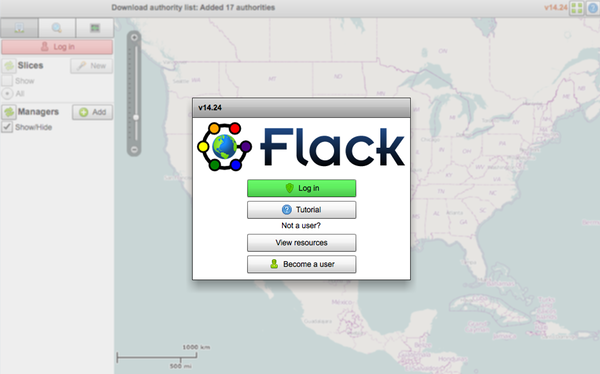
Step 2. Open Flack In A New Tab
Next, we’ll open Flack in a new browser window or tab: http://www.protogeni.net/trac/protogeni/wiki/Flack .
Figure 2: Flack Initialized
Step 3. Log In With Flack
As we had done previously, choose the correct clearinghouse if it isn’t already selected along the top of flack. Click the “download” button to have your keys loaded, and enter you password.
When prompted to select where to list resources from, leave all of the options checked and click “Continue”.
Step 4. Let’s Look At Our Gigabit Backbones
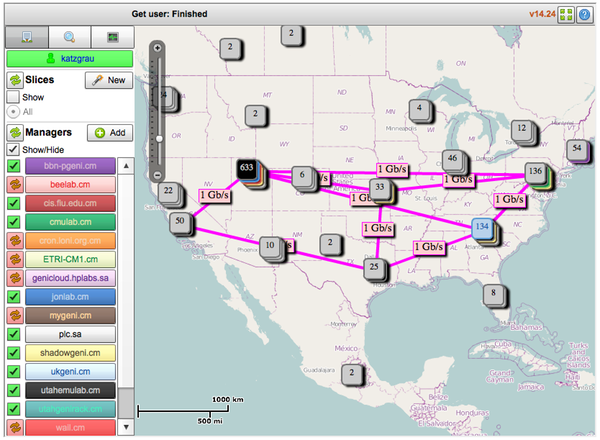
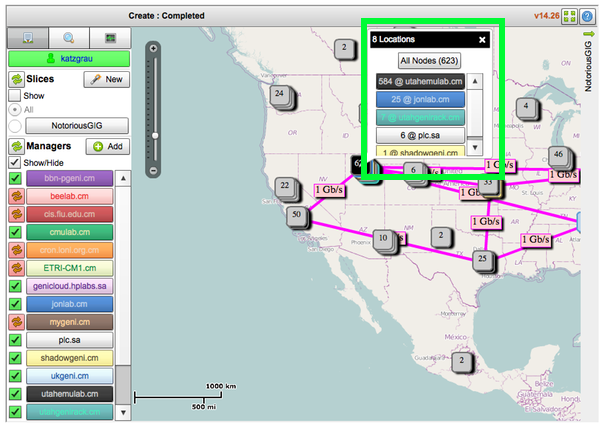
Let’s take a look at the map that is displayed when the authority list loading is complete. Do you see the pink lines running across the map? Those are gigabit backbones that are available to use.
In order to utilize a gigabit backbone, we’ll provision a machine at both ends of it. In this example, one end will be in Utah and the other will be in Washington DC.
In the image below, the Utah aggregate is black and has the number “633” on it. Washington DC is grey and has “136” on top of it.
Note: Because those numbers denote the number of resources available in those aggregates, the number fluctuates, and is likely different at the time that you are reading this.
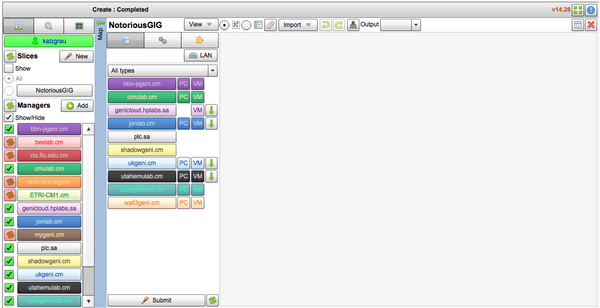
Step 5. Create a New Slice
Let’s create a new slice for our gigabit experiment to live in. Give your slice a different name than the one in the figure below.
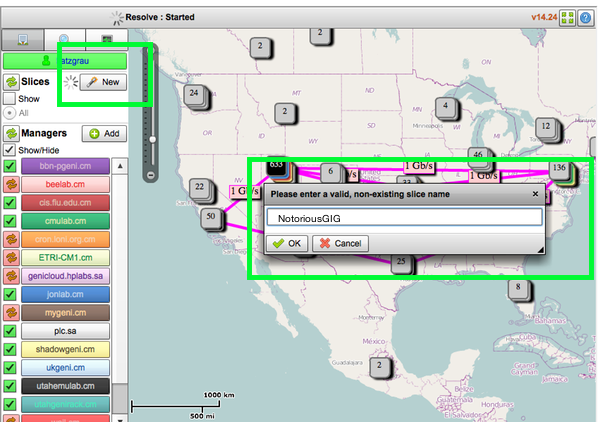
Click “Ok” and wait for your slice to initialize. When it’s done, you will see:
Step 6. Find A Machine With A Gigabit Link
Just as before, we’re at the fun part of the experiment. Let’s go hunting for a machine that’s hooked up to the Gigabit backbone in Utah. Click on the Map panel in the left part of the screen:
Click on the Utah aggregate. You’ll see a box pop up with a breakdown of the different authorities in that grouping. For these tutorials, we’ll stick with Utah/emulab, since they have the most resources available at the time of this writing.
Click on the box labeled “utahemulab.cm” to see the list of resources available. You’ll see:
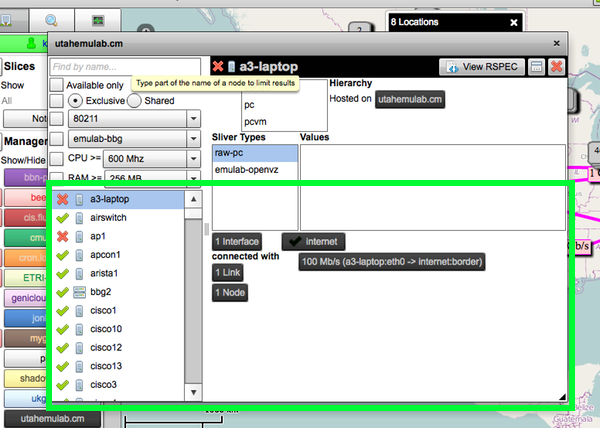
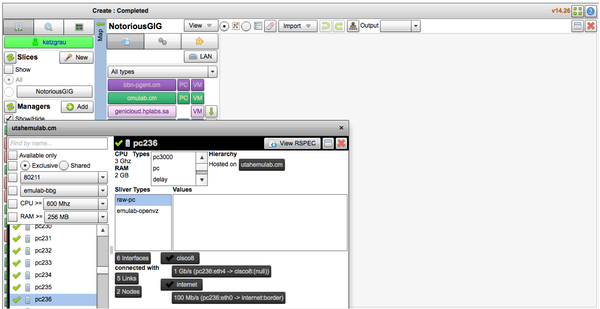
Our goal here is to find a PC hooked up to a gigabit interface, which will be labeled in the right pane as “1 Gb/s (...)”. Find one, like we did in the figure below.

Note: It’s possible, but not highly likely, that all gig resources are unavailable, in which case they’ll have a red “x” in front of them instead of a checkmark. In this case, you may need to find another utahemulab.cm grouping on the map which has a gigabit-linked PC available.
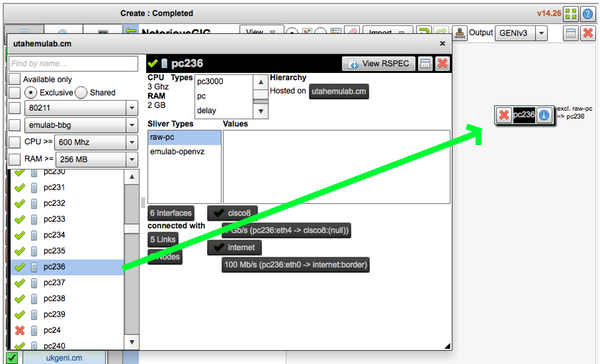
Now that you’ve found a machine with a gigabit link, drag that top-level window off to the side, and bring your slice pane back up by clicking on the name of your slice on the left side.

Click into your slice, and drag that resource window over to the left so you can see your pane:
Drag the Gigabit PC we found over to the pane, like so:
Step 7. Find Another Machine With A Gigabit Link
We’ve now got a machine in Utah ready to go in our Gigabit setup. But now we need a machine on the other end of a network link. Back to the map!
It was our stated intention at the beginning of this example to get a link going from Utah to Washington DC. As mentioned before, resources on GENI are limited, and it’s possible that resources aren’t available in DC when you run this experiment. If that turns out to be the case, pick another grouping of resources on the map that have a pink line running from Utah.
So let’s look at Washington DC’s grouping of resources, since the pink line representing a gigabit link runs directly from Utah.
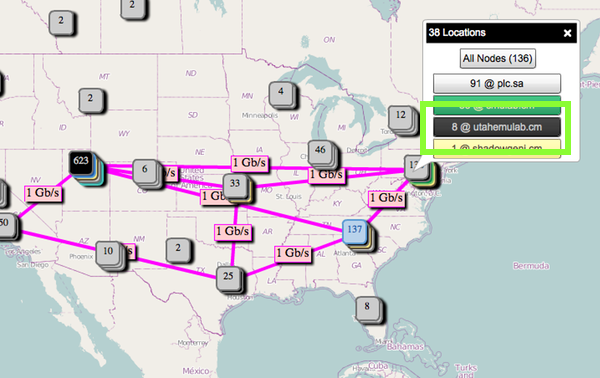
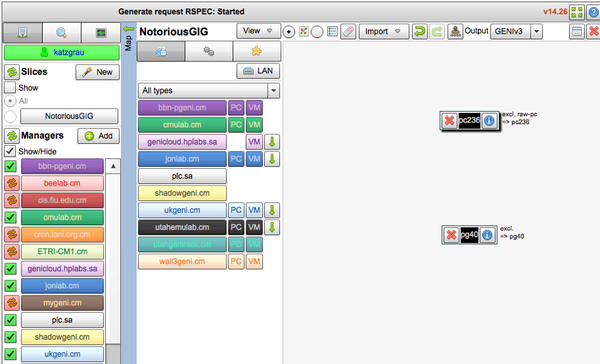
We can see in the figure above that we have 8 resources for our use in utahemulab.cm. Click into that, and you’ll likely see something similar to the figure below.
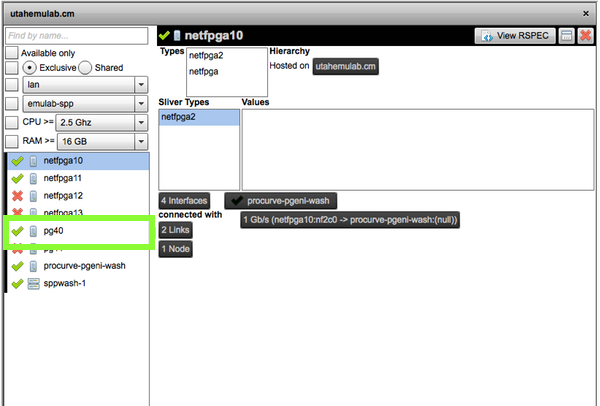
Remote computing resources are prefixed with “pg” as opposed to “pc” like we saw in Utah. pg40 in the figure above is hooked up to a gigabit link — just what we need! We’ll take the one resource available in the window above, and drag it to our slice as before.
At this point, our Utah and DC machines should be sitting in our slice:
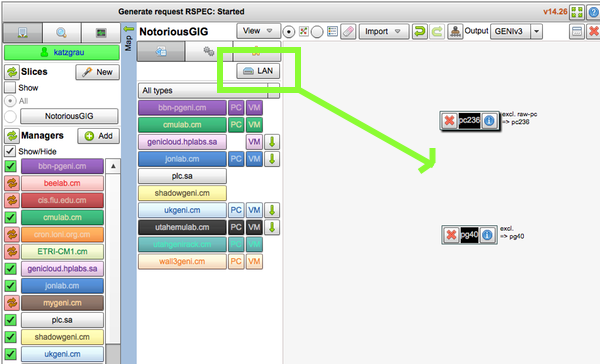
Step 8. Set Up a Gigabit Network!
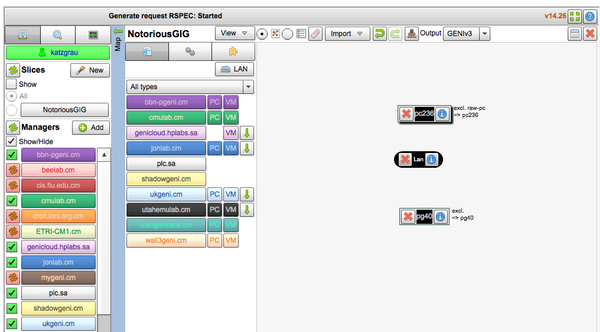
We’re now ready to hook up our network. Toward the upper left part of the slice pane, a LAN resource is available for us to drag into the slice.
Before:
After:
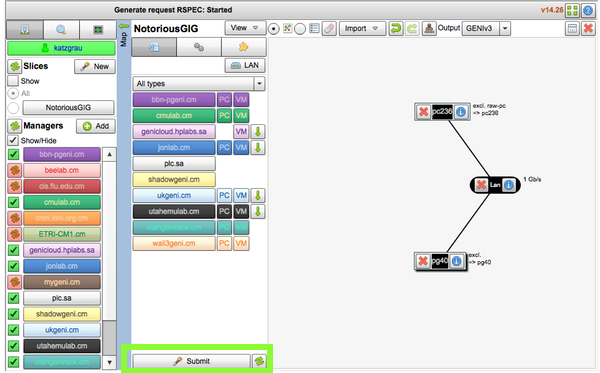
From here, drag a line from each machine to the lan. Your final lan should look like:
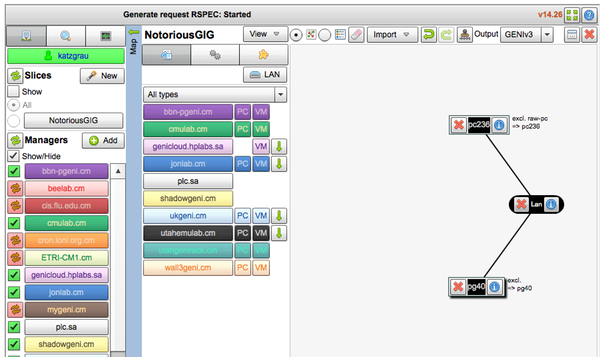
This is all very similar to how we set up our network in example 1. However, this time we need to explicitly set the speed of the lan to be 1 Gb/s.
Click the blue “i”, or “information” icon on the lan. The information pane for the lan will appear. We want to change the properties of the lan, so we’ll click on the “properties” tab:

In the capacity field, enter “1000000”. The unit of the capacity field is in kb/s, so we enter one million to specify 1 gb/s.
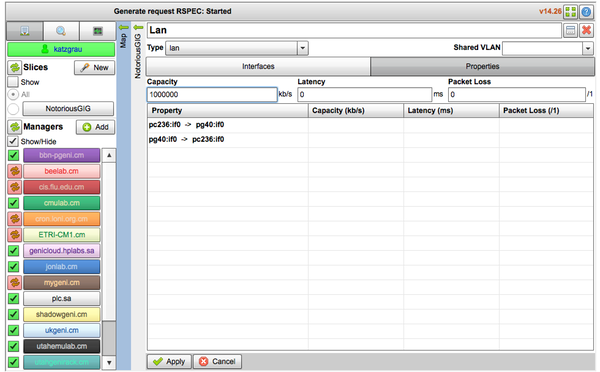
Click “Apply” at the bottom of the screen. If you’ve made it this far, congratulations! It’s time to reserve your gigabit network! Click “Submit” at the bottom of the slice pane, and confirm.
Note: This can sometimes be a process that takes up to 15 minutes, and it occasionally fails or hangs. If it does fail, you may try again until it succeeds. If it continues to fail, it may be possible that your resource was granted to another experimenter while you were setting up your lan. You can click the “refresh” icon above the “Managers” list on the far left side of Flack to get the latest resource lists.
When your new machines and networks have been provisioned, you’ll see a green background:
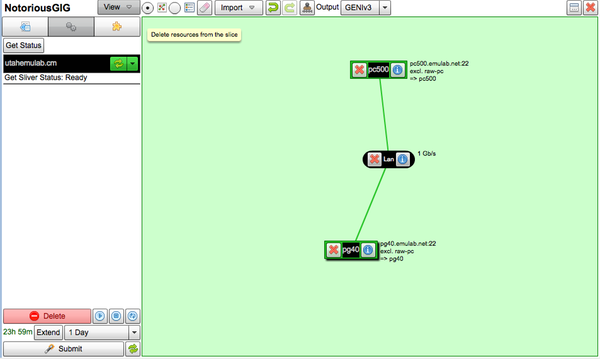
Author’s Note: In the process of setting this up, I did in fact run into the provisioning failure I said might happen. You’ll notice that I had to replace pc236, which was no longer available, with pc500 from the same Utah grouping.
You now have a full provisioned Gigabit lan!
Step 9. Log in to the machines
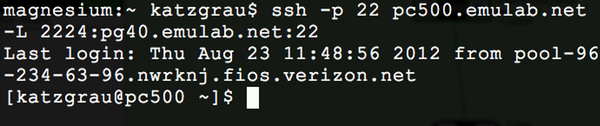
Let’s now open two terminals windows - one for each box we’ve provisioned, and one for an SSH tunnel that we’ll need. Let’s start with logging into the box prefixed with pc. You should specify the address of the pc, and be sure to include the port number of needed with the -p flag.
Note: At the same time we’re going to log into the first box, we’ll set up an SSH tunnel that we can use to log into the other box. pg40 is behind a firewall, and we won’t be able to access it directly.
Your SSH login command should look like:
ssh -p [pc 1 port] [pc 1 host] -L 2224:[pc 2 host]:[pc 2 ssh port]
So with the machines we’ve been working with, we’ll do just that:
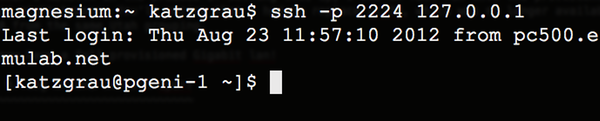
Great. Now for logging into the second box (prefixed ‘pg’). Since we have a tunnel open on port 2224 locally, we’ll connect to that. You can type the same exact command, replacing [username] with your username:
$ ssh -p 2224 [username]@127.0.0.1
Step 10. Install iperf
Now, let’s check our network connection. Run this in the terminal with the connection to the machine prefixed with pc:
$ cat /etc/hosts
You’ll see something similar to:
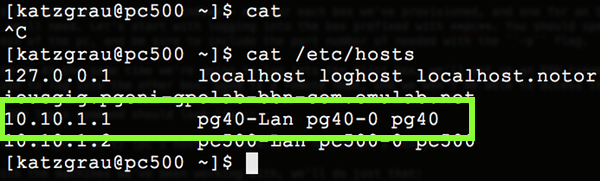
The line highlighted in the image above is the alias to the remote host. It will be prefixed by pg. Let’s keep that in mind.
Next, run this command in the window with the pc prefix. This will download and install iperf:
$ wget http://iperf.googlecode.com/files/iperf-3.0b4.tar.gz && tar -xf iperf-3.0b4.tar.gz && cd iperf-3.0b4 && ./configure && make && sudo make install ; cd
You’ll see something similar to:
[katzgrau@pc500 ~]$ wget http://iperf.googlecode.com/files/iperf-3.0b4.tar.gz && tar -xf iperf-3.0b4.tar.gz && cd iperf-3.0b4 && ./configure && make && sudo make install ; cd
--2012-08-23 14:31:23--  http://iperf.googlecode.com/files/iperf-3.0b4.tar.gz
Resolving iperf.googlecode.com... 173.194.79.82, 2607:f8b0:400e:c01::52
Connecting to iperf.googlecode.com|173.194.79.82|:80... connected.
HTTP request sent, awaiting response... 200 OK
Length: 309547 (302K) [application/x-gzip]
Saving to: `iperf-3.0b4.tar.gz.1'

100%[========>] 309,547     1.31M/s   in 0.2s

2012-08-23 14:31:23 (1.31 MB/s) - `iperf-3.0b4.tar.gz.1' saved [309547/309547]

checking for a BSD-compatible install... /usr/bin/install -c
checking whether build environment is sane... yes
checking for a thread-safe mkdir -p... /bin/mkdir -p
checking for gawk... gawk
[truncated for brevity]
make[2]: Leaving directory `/users/katzgrau/iperf-3.0b4'
make[1]: Leaving directory `/users/katzgrau/iperf-3.0b4'
Great! We’ve just installed iperf on our first box.
Open a new, temporary terminal window. Copy and paste this command:
wget http://iperf.googlecode.com/files/iperf-3.0b4.tar.gz && scp -P 2224 iperf-3.0b4.tar.gz 127.0.0.1:~/
This will download iperf, and send it to our box in DC, pg40.
Lastly, open the terminal tab of the box prefixed with pg. Run:
tar -xf iperf-3.0b4.tar.gz && cd iperf-3.0b4 && ./configure && make && sudo make install ; cd
You now have iperf installed on both machines!
Step 11. Run iperf
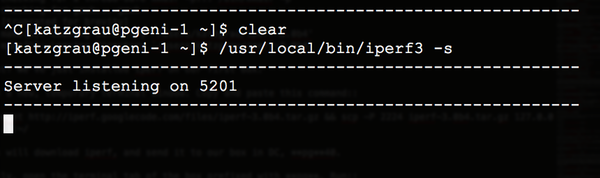
In the terminal window that is connected to pgXXX, start the iperf server:
$ /usr/local/bin/iperf3 -s
You’ll see something similar to:
In the terminal window that is connected to pcXXX, kick off the iperf client. Be sure to enter the appropriate host for your experiment:
$ /usr/local/bin/iperf3 -c
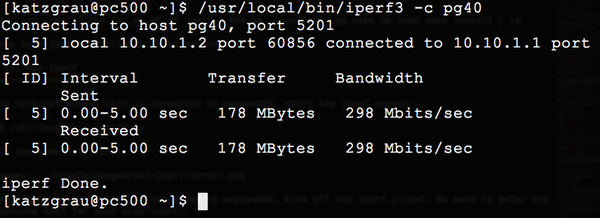
Awesome! You’ve just gigabit data transfer from Utah to DC!
In the figure above, we can see that data was transferred at about 300 Mbits/s. That data transfer was over TCP, which is slower than UDP due to its mechanisms for avoiding data loss. We’d test with UDP, but at the time of this writing, the -u flag for iperf3 is broken!
Imagine the possibilities. You have a gigabit network to play on. What could you hack on, or create?
But remember: If you don’t need the resources you provisioned right now, it’s better that you delete your machines/slivers and release them into the pool of available resources for other hackers and experimenters.
Lastly, if you found yourself tripped up by any part of this tutorial, be sure to reach out to katzgrau@gmail.com with feedback or questions.